(edit: after many thoughts, I realized this guide looked pretty awkward and decided to rewrite it into a more global approach instead of this homemade-like how-to so you can understand the process better. If I’m not too lazy, I’ll write a newer article)
(edit #2, 29/10/2019: You may have guessed that I’m constantly trying to perfect this process by experimenting new steps. I recommend to check out this post I made on /r/audiophile for a variation of this process and more 30s samples with songs from various genres too)
(edit #3, 22/12/2023: As you guessed, this process has evolved again, and in the meantime I discovered a new VST simply called Transient made by Sleepy-Time Records, which is more precise and produces more transparent results, eliminating the need of that useless reverb and noise-gate I was applying on some earlier iterations of this procedure)
Recently on Twitter, I posted a very short but messy how-to about transient restoration for loud or compressed recordings. I used a 1994 eurodance single as an example in my tweets.
I’ve been doing that since 2008 which matches the time where I started to feel concerned about the loudness war. At the beginning, I was using only transient shapers. But over the time, I learned to perfect my method by isolating transients better and minimize any artefact created by my process. I think it’s time for me to write a more detailed how-to about my method of restoring transients or squished portions of audio on any kind of audio material. With very clean, transparent and artefact-free results. Yes, sir!
Before beginning, here are the prerequisites in order to complete our task:
– a sound editor with VST support
– digitalfishphones’ Dominion VST plugin (http://www.digitalfishphones.com/main.php?item=2&subItem=4)
– Michael Gruhn’s Transient Shaper VST plugin (http://dioxaz.free.fr/download/midi_vst/VSTBundleWin32_FINAL_2008-01-27.zip)
– a noise-gate VST such as GGate (http://www.gvst.co.uk/ggate.htm)
– a brickwall limiter such as TLs Pocket limiter (https://www.kvraudio.com/product/tls_pocket_limiter_by_tbt), might not be necessary
– both plugins extracted to your desired and usual VST plugins folder
– your sound editor configured to use those VSTs and/or its VST list properly refreshed
– it is highly recommanded to use a sampled-based scale rather than time-based in order to have sample-based precision for our selections, otherwise you’ll have all sorts of unwanted frequency shifts because of delays induced by VST plugins
Update: I’ve made another attempt with a slightly more striking example, using Keane’s Somewhere Only We Know. Also, if you don’t want to read the following long text and don’t care about pictures, here’s a link to a shorter and more summed up how-to: https://fr.reddit.com/r/LoudnessWar/comments/5i67ux/transient_restoration_dynamic_range_expansion_on/db73rqb/
Important note: I used Audition’s FFT filter for the vast majority of my operations performed here and there’s a good reason why I did that. Adobe Audition’s FFT filter allows isolating frequency bands with an unmatched precision and this is absolutely crucial to the efficiency of our whole process. Adobe’s FFT filter is also totally delay-free which will save some headaches trying to rematch your audio instances because the filter VST you used adds all sorts of random delays to your audio, resulting in nasty frequency shifts. This sadly means the manipulations you’ll read below are non reproducible with open-source and free tools as none of them offers FFT filters. And from all of the available free VST filters I know, I’ve yet to see one performing as good as Adobe’s FFT filter without introducing all sorts of delays to the audio.
If you happen to own the album or have that song lying around, you can even try to do it yourself, as it may give you very pleasing results (you can even attempt your own improvements).
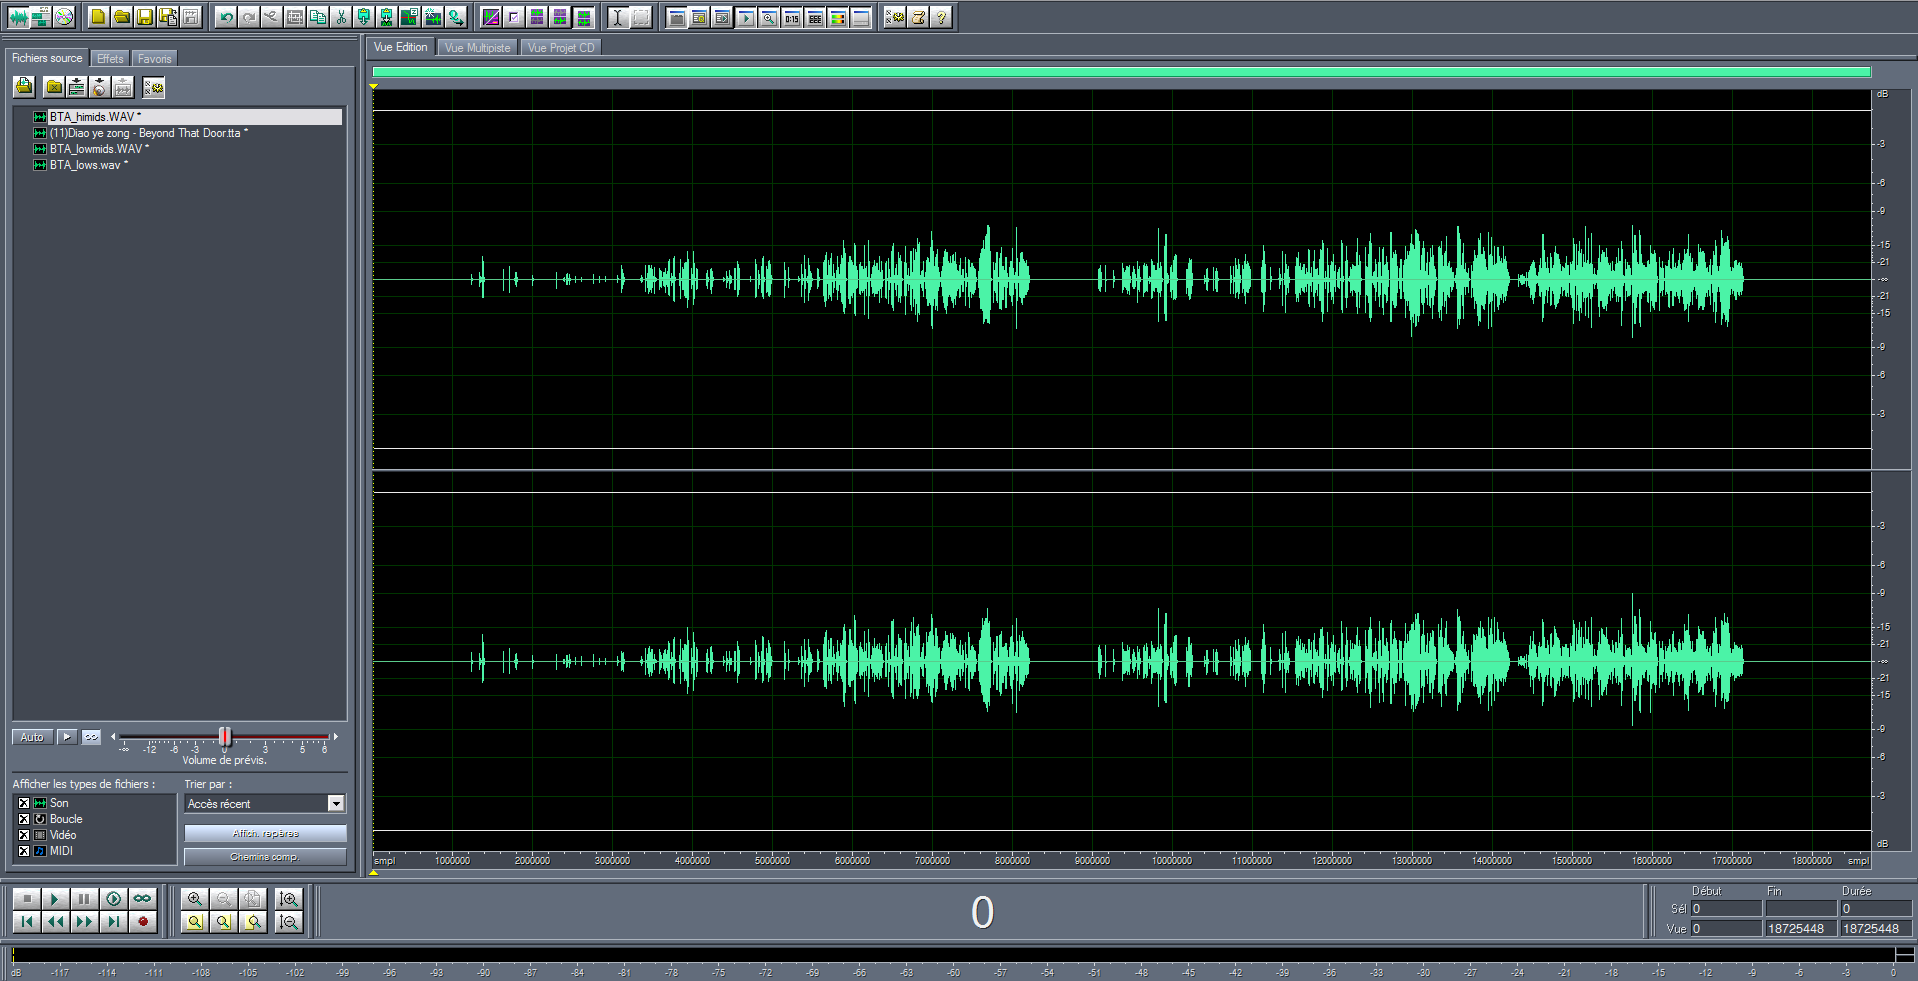
For this example I’ll be using a Touhou Project arrangement this time. It’s Beyond That Door by circle Diao ye zong. It’s not a particularly significant or bad example but still yeilds the usual bad habits of current day loudness-based mastering with your usual pushing to the “zero” (0dBFS), its limited peaks and flattened out longer portions.
So here’s what it looks like when opened with (insert your usual audio editor). Here, it’s Adobe Audition 1.5:
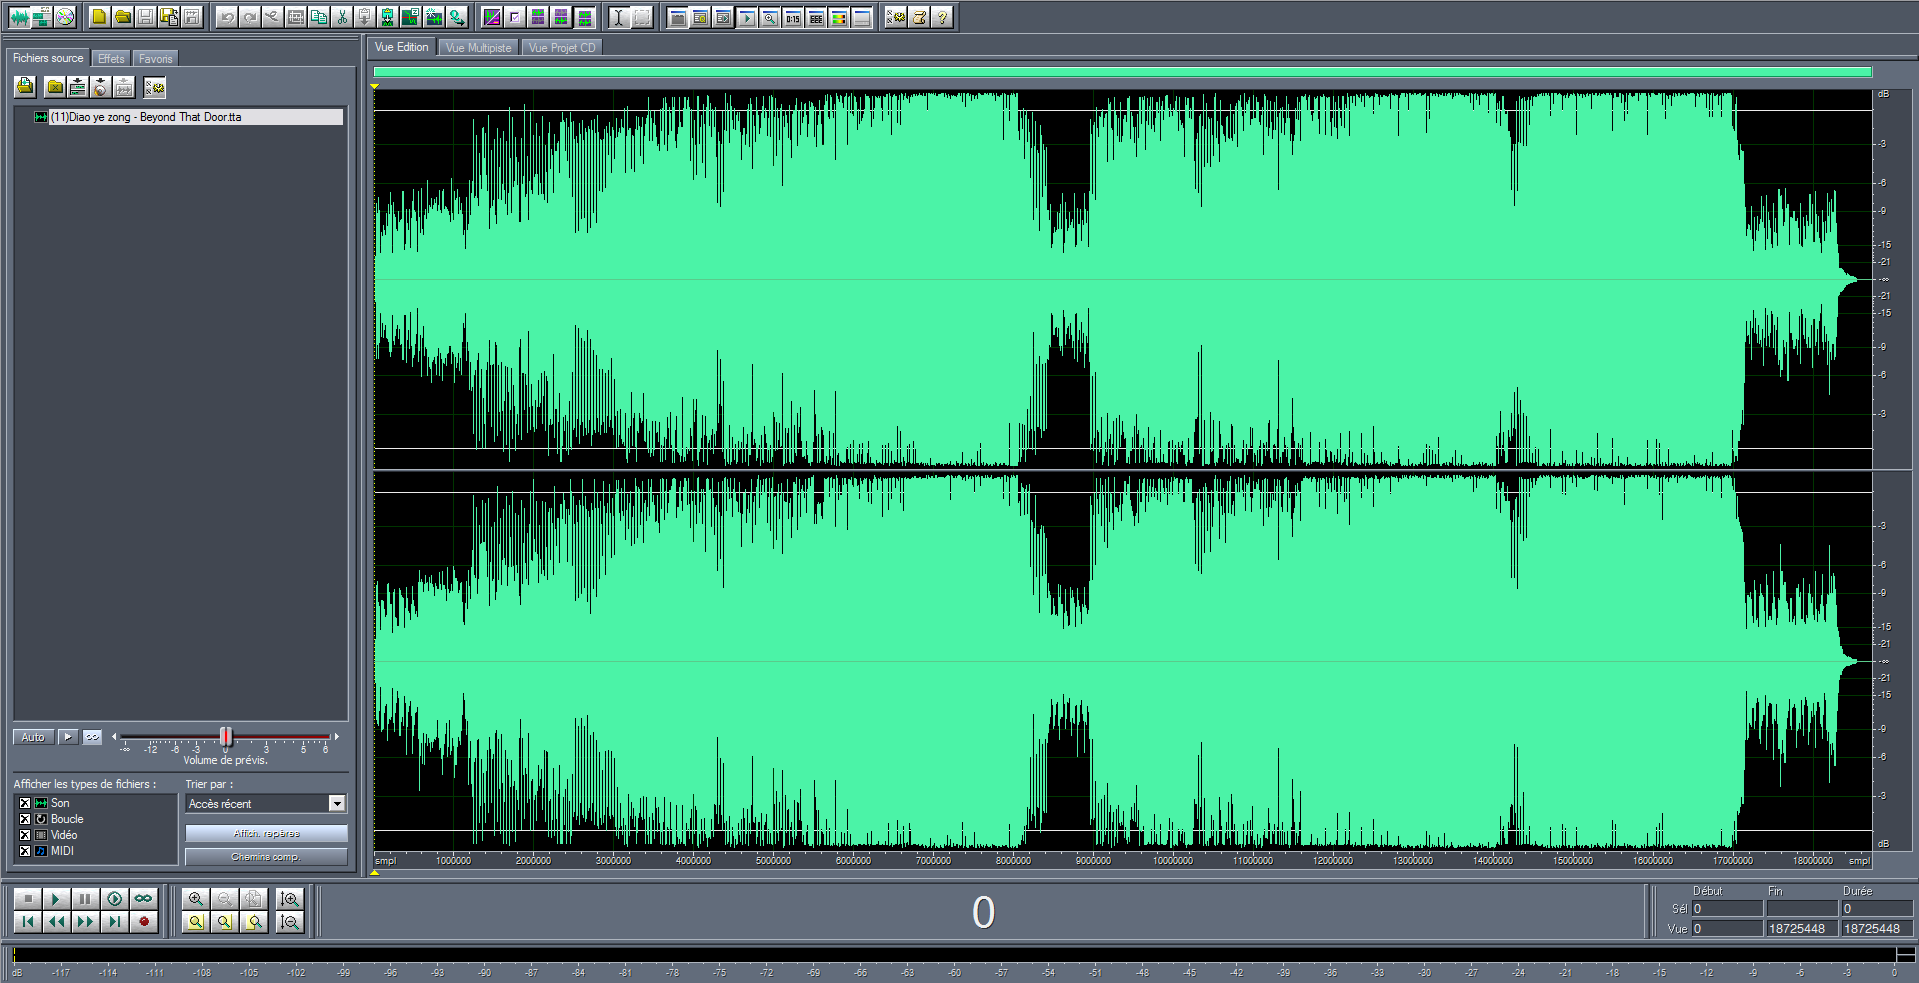
As I said not really that bad but we are going to bring that to almost late 80s-style mastering.
The first thing you’re going to do is turning it down to your desired or what you think is the ideal volume. It can be anything depending on your tastes and your habits. Don’t hesitate to go as low as 10dB of volume reduction if you feel it’s needed or if your song is definitely too loud. For this one, I’ll target 6dB of volume reduction:

Now, leave that instance alone. Create a copy of it and paste it in another instance. Your’ll need it for your actual job. You might need to paste it as many instances you need depending on how much frequency ranges you plan to work on (lows, lower mids, higher mids, highs, etc.).
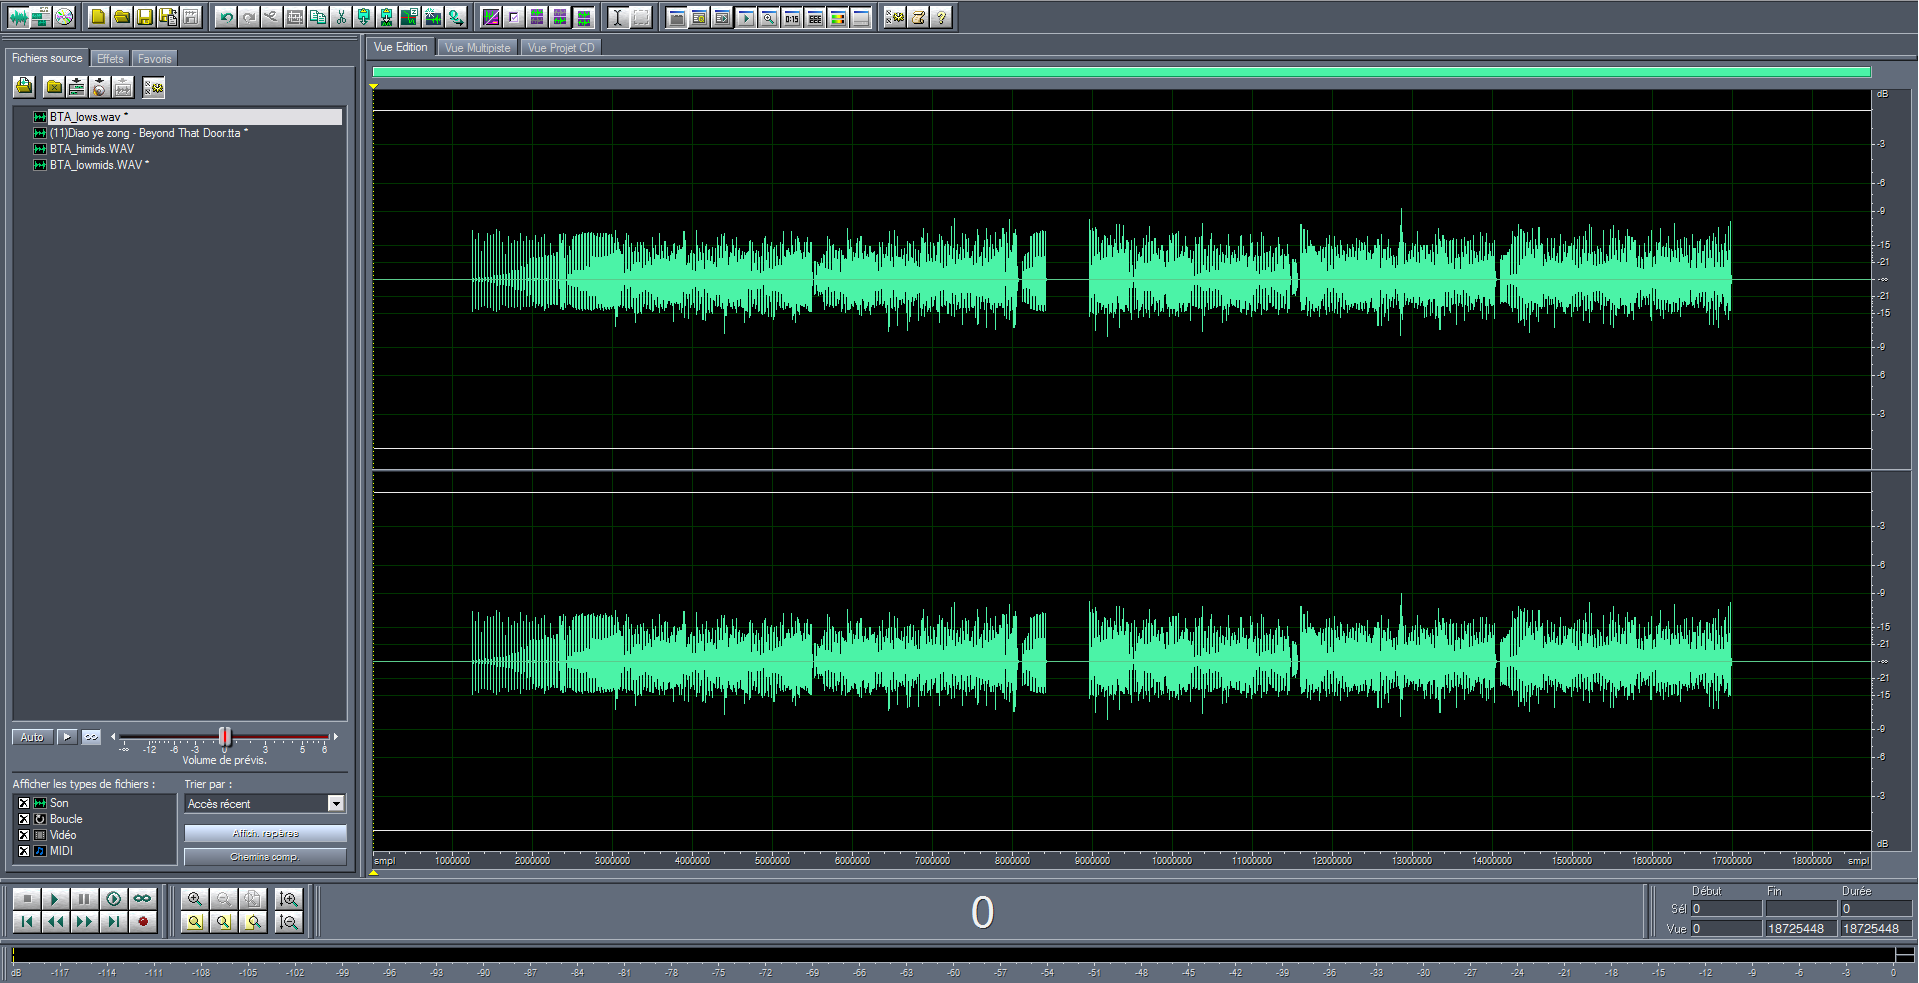
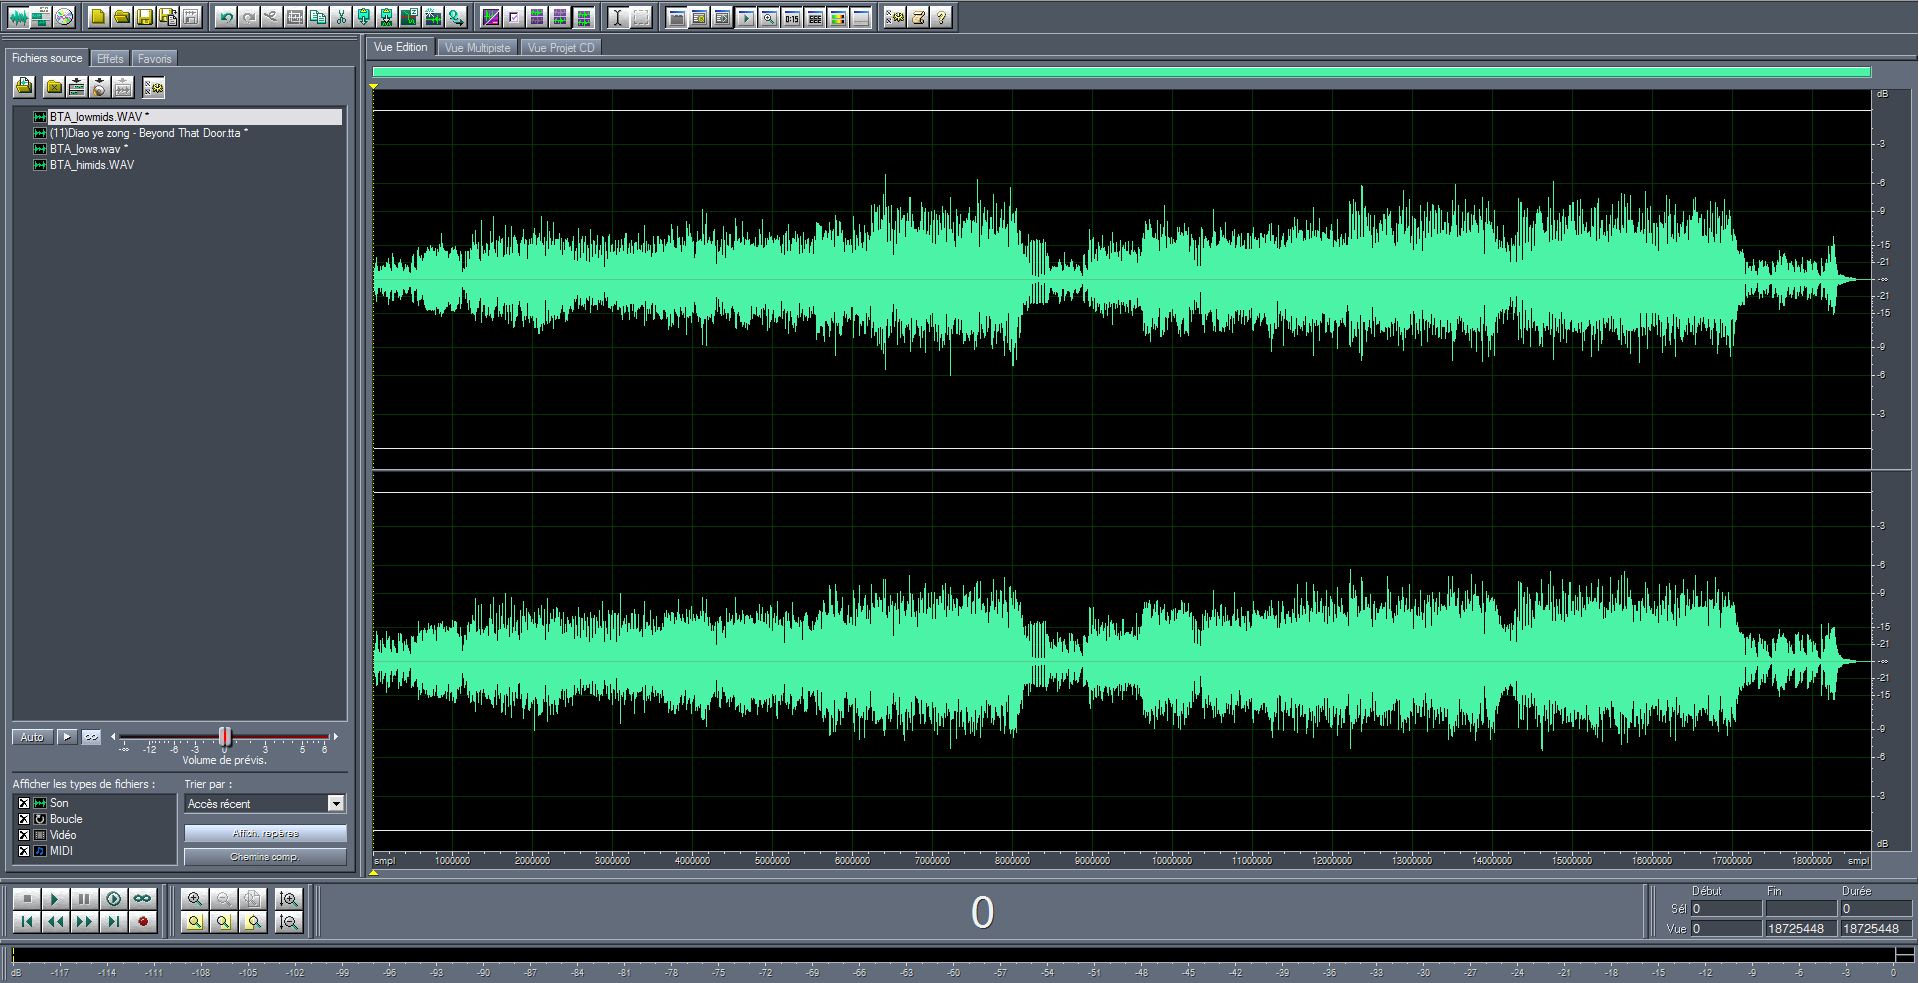
Let’s begin by taking care of the bass part of the song. To do that, we need to apply a band-pass filter to cut out anything that is not bass. If using Adobe Audition, then the best effect for this task is FFT filter (the one which allows you to draw a shape and set blocked frequencies at 0% and passed ones at 100%). We need to determine the sections which are actually affected by compression and limiting. So don’t hesitate to trial-and-error and see which frequency range is the best suited to isolate the visually squished parts, by comparing the waveform of your filtered result to the original one. The narrower the range the better it is (but for bass, you can easily go up to 200Hz). On this example, I chose a range of 0-180Hz for my band-pass:
So we have the bass isolated. The goal is to have transients appear, which is the case here. It means there are some potentially restorable transients in that frequency range.
Before starting, copy the entire audio of this band-passed low range into clipboard (Ctrl+C or Edit->Copy). It will be useful for later.
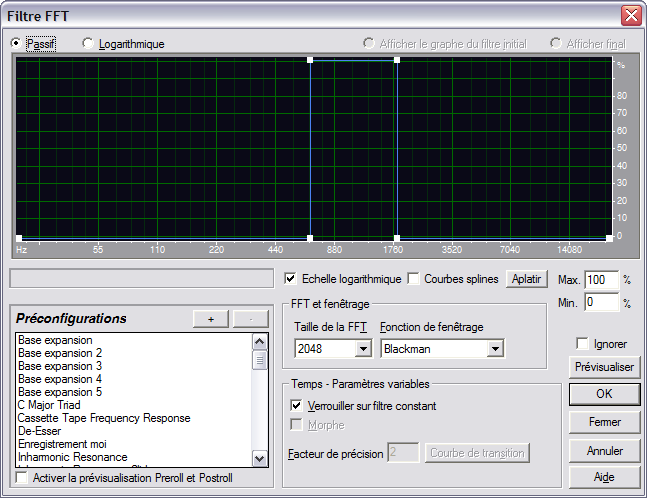
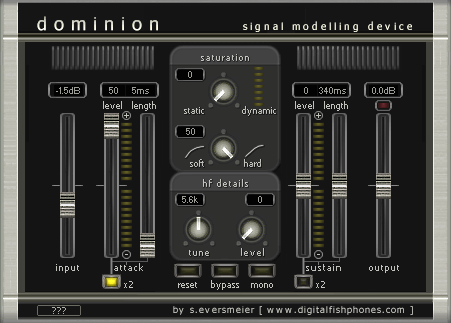
Now, let’s grab one of our transient shapers. For the bass, I think Dominion is much better suited, even if it’s creating some bass shift afterwards. Apply settings as indicated in the following screenshot. Set input volume to -1.5dB, tick “x2” at the bottom attack sliders, set attack level to 50 and attack length to 5ms. There’s no need to touch at other sliders:
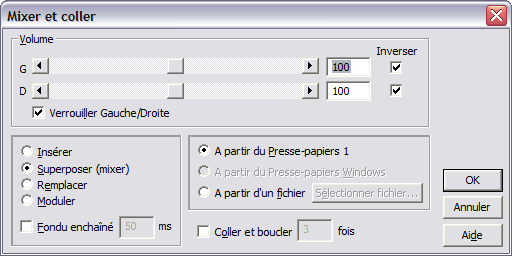
After applying the VST, you’ll normally see your transients going up in volume while maintaining quiet parts roughly the same. That’s exactly what we want! But it’s not over. Dominion creates a delay of 101 samples (for 44100Hz audio) when operating. So we need to delete 101 samples at the beginning of the audio. Now we have to make the difference between the original band-passed audio and this transient shaped attempt. To do that, place your cursor at the very beginning (or sample 0) and paste-mix back what you copied earlier but with inverted phase. If using Adobe Audition, use Ctrl+Shift+V and this dialog appears. You just have to tick “Invert” for both channels:
We do that in order to create some sort of expansion matrix. If we stopped at this stage and pasted our band-passed shaped transients as is back to the original audio, without subtracting it, there would be a huge EQ shift in the bass!!
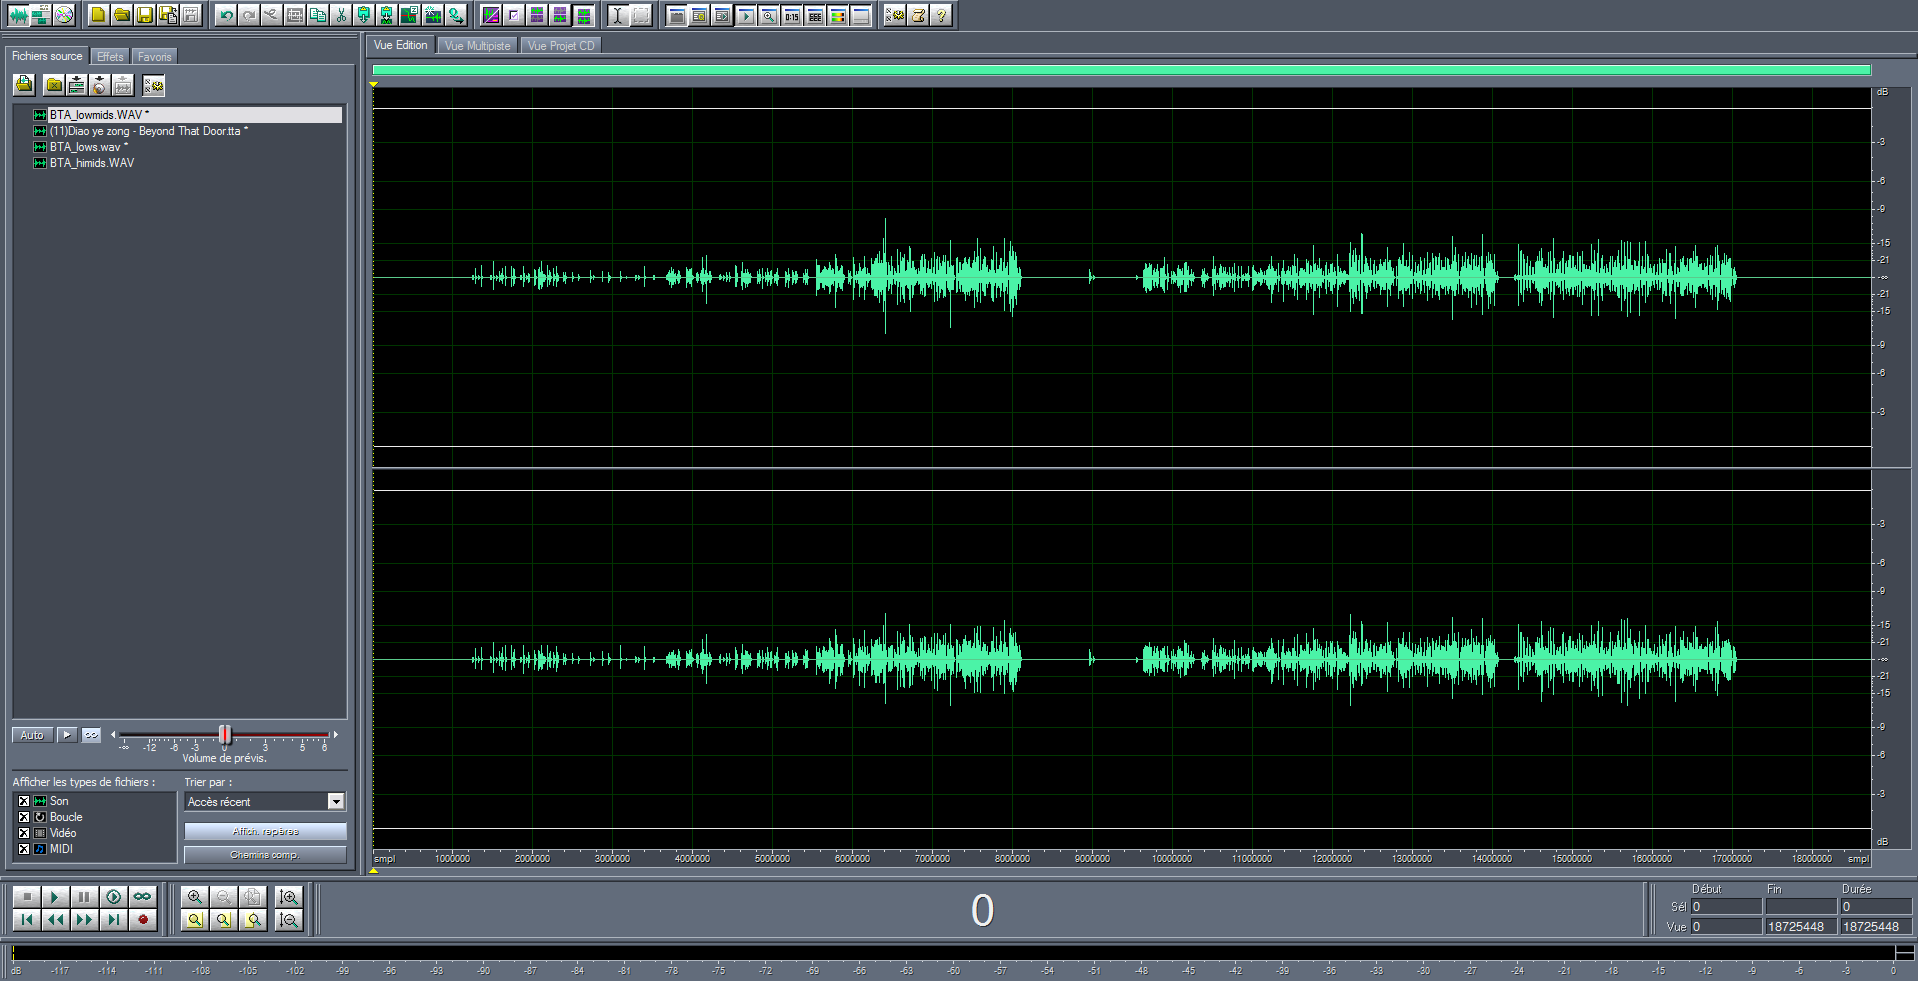
Then, to isolate the transients further, we need noise-gating all the quiet parts. In this example, I’ll noise-gate anything below -21dBFS in order to minimize the bass-shifting created by Dominion. You can either use a brickwall limiter set to 21dB, then reduce the audio to -21dB, then remove the sample delay produced by your VST (for TLS Pocket Limiter, you need to delete 1 sample at the beginning) and mix back an inverted copy of the limited audio to the non-limited one, using Cancel history (Ctrl+Z or Edit->Cancel) or creating more instances. Or, more simpler, use GGate, set the threshold to -21dB, attack and fade to your likings and there you go:
Yes, my friends, isolated bass restored transients! Now it’s time to mix them back to the original song.
But before doing so, in order to get rid of any possible artefact created by our process, let’s band-pass a second time to the same frequency range as before. Your filter settings must not get lost at this point. They should be normally still stored in memory as your last used settings if you did not mess up or if your program didn’t crash in the meantime. In case, you can write your frequency range down or store a preset in your audio editor.
Now the waveform changed a very little bit. It’s time now to mix it back (paste-mixing) to the original song. Copy that bass restored transient audio instance into clipboard (Select all then copy). Go back the original audio instance (which has been turned down to your desired volume, here it was a 6dB reduction). Put the cursor at the beginning at the audio (sample 0). Now, paste-mix what you’ve just copied at full volume with original phase (not inverted, don’t forget to untick “Invert” for both channels if using Adobe Audition) and enjoy the result!! All bass transients came back to life again! Listen to the song and see it satisfies you. If not, try different volume mixing settings (you might try to tame things down by setting mixing volume to something like 70% in order to prevent transient shaping gone out of control and possible clipping, or increase to something like 150 or 200% it it’s not enough for you). For this song I let it mix at 100% volume.
So we took care of bass. All bass transients seemed to go up without touching at the quietest parts.

This is starting to look really good! But we notice some parts still look flattened out, notably louder vocal or instrument parts like violins and pianos. These are definitely not transients. However, we’re going to use a similar method. Let’s go back to the bass instance and cancel everything we did or work on another instance you created or copied from your untouched original (with volume reduction applied) previously.
We have to determine on which frequency range the squishing is occurring. Depending on the song, you may or not need to take care of the low or high midrange. Let’s do some trial and error and begin by the low midrange. If you get something close to the squished parts you observed or the original waveform, then you’re on the right track. On the contrary, if your band-pass don’t reveal any transient or louder parts, then try another one.
So for this step, we are going to band-pass anything between 180Hz and 650Hz approximately. You can see how the loud parts actually match some of the remaining squished parts (I concede it’s not obvious on this particular example), such as loud vocal parts:
Before attacking, don’t forget to copy this band-passed low midrange audio to the clipboard, just like we did for the previous frequency range.
Now repeat the same process we did above by using Dominion, this time setting input volume to -2dB and attack level to something between 25 and 40 (I used 30 in this example). Again, trial and error. Choose a setting which allow transients or loud parts not to go out of control (or clip). Don’t forget to delete 101 samples at the beginning after Dominion is applied. Put the cursor at sample 0 and paste-mix what you copied earlier (band-passed low midrange before transient shaping) with inverted phase. We can see now that the quietest parts are now below -27 or -30dBFS. Noise-gate to that, band-pass a second time to the same frequency range and you’re almost done:
If there are still some quiet parts where nothing should be altered (parts matching to quieter parts where no restoration is required), just silence them out after selecting them, one after the other (Effects->Silence in Adobe Audition) to keep only your loudest parts restored. Now you’re ready to copy the result and paste-mix it back to the original audio at desired mixing volume.
Note: this frequency range generally contains some snare components in most songs. Not in this one. However, if your audio does contain audible snare transients (even kick transients in most mid-90s Dance songs) in this frequency range and the shaping happens to go out of control, making transients really irregular in volume, then you can attempt limiting them, by using TLs Pocket limiter. Basically, you limit them at the volume threshold you desire (if you don’t want your transients to go over -6dBFS, choose a +6dB limiting), then reduce volume by the same amount, then delete 1 sample at the beginning of the audio (for 44100Hz audio) in order to compensate its VST delay.
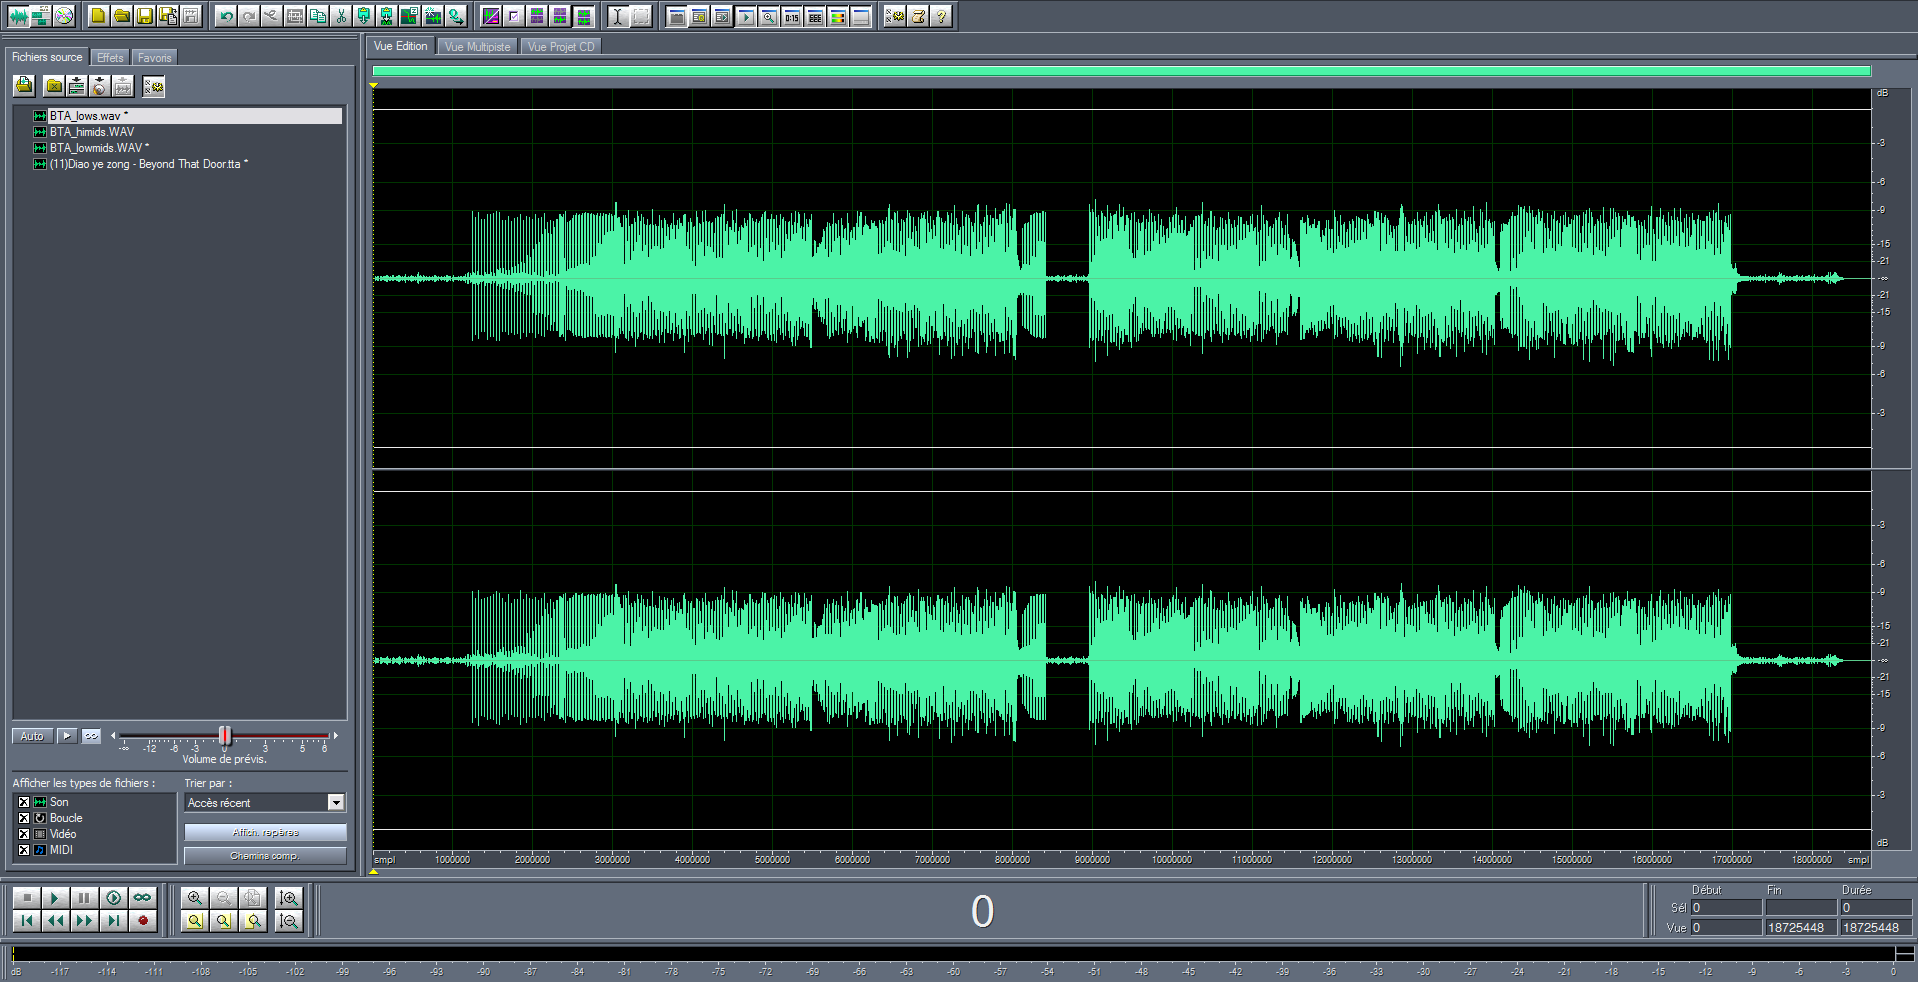
Okay, it’s now looking like something. Just watching the waveform, it’s now looking straight like something that could have been released in the late 80s. And some of you may stop now and be happy. But sometimes, you also need to do the upper midrange and high-range too as squished areas are still present. In this example, I did another transient shaping on the upper midrange, between 660Hz and 1800Hz approximatively, with the same methodology as above, still choosing Dominion as the transient shaper and using -1.5dB as input level and 28 as attack level. My isolated, shaped and gated transients and loud parts for the upper midrange look like this:
If you intend to perform transient and loud parts restoration on high-range, you have to be very careful as it is the most sensitive frequency range when it comes to artefacts. Actually, it’s in that frequency range that artefacts are the most audible. At this stage, there are 2 solutions. If the highs contain only short transients, then it’s best to use Michael Gruhn’s Transient Shaper instead with attack level to max (200 if I remember). However, if it still contain longer louder parts, then use Dominion, but very carefully. You can start by reducing the attack level to something like 20 or 25 and try out some longer attack lengths. You can experiment longer releases when noise-gating too. But don’t forget that if your shaping goes out of control for highs then you’ll be more likely to kill the transparency of your song.
I didn’t perform any transient shaping for the high-range as I felt it wasn’t necessary due to the nature of the song. Here’s what the final waveform looks like after paste-mixing all shaping attempts (both low-range, lower midrange and upper midrange) back on the original audio reduced by 6dB:
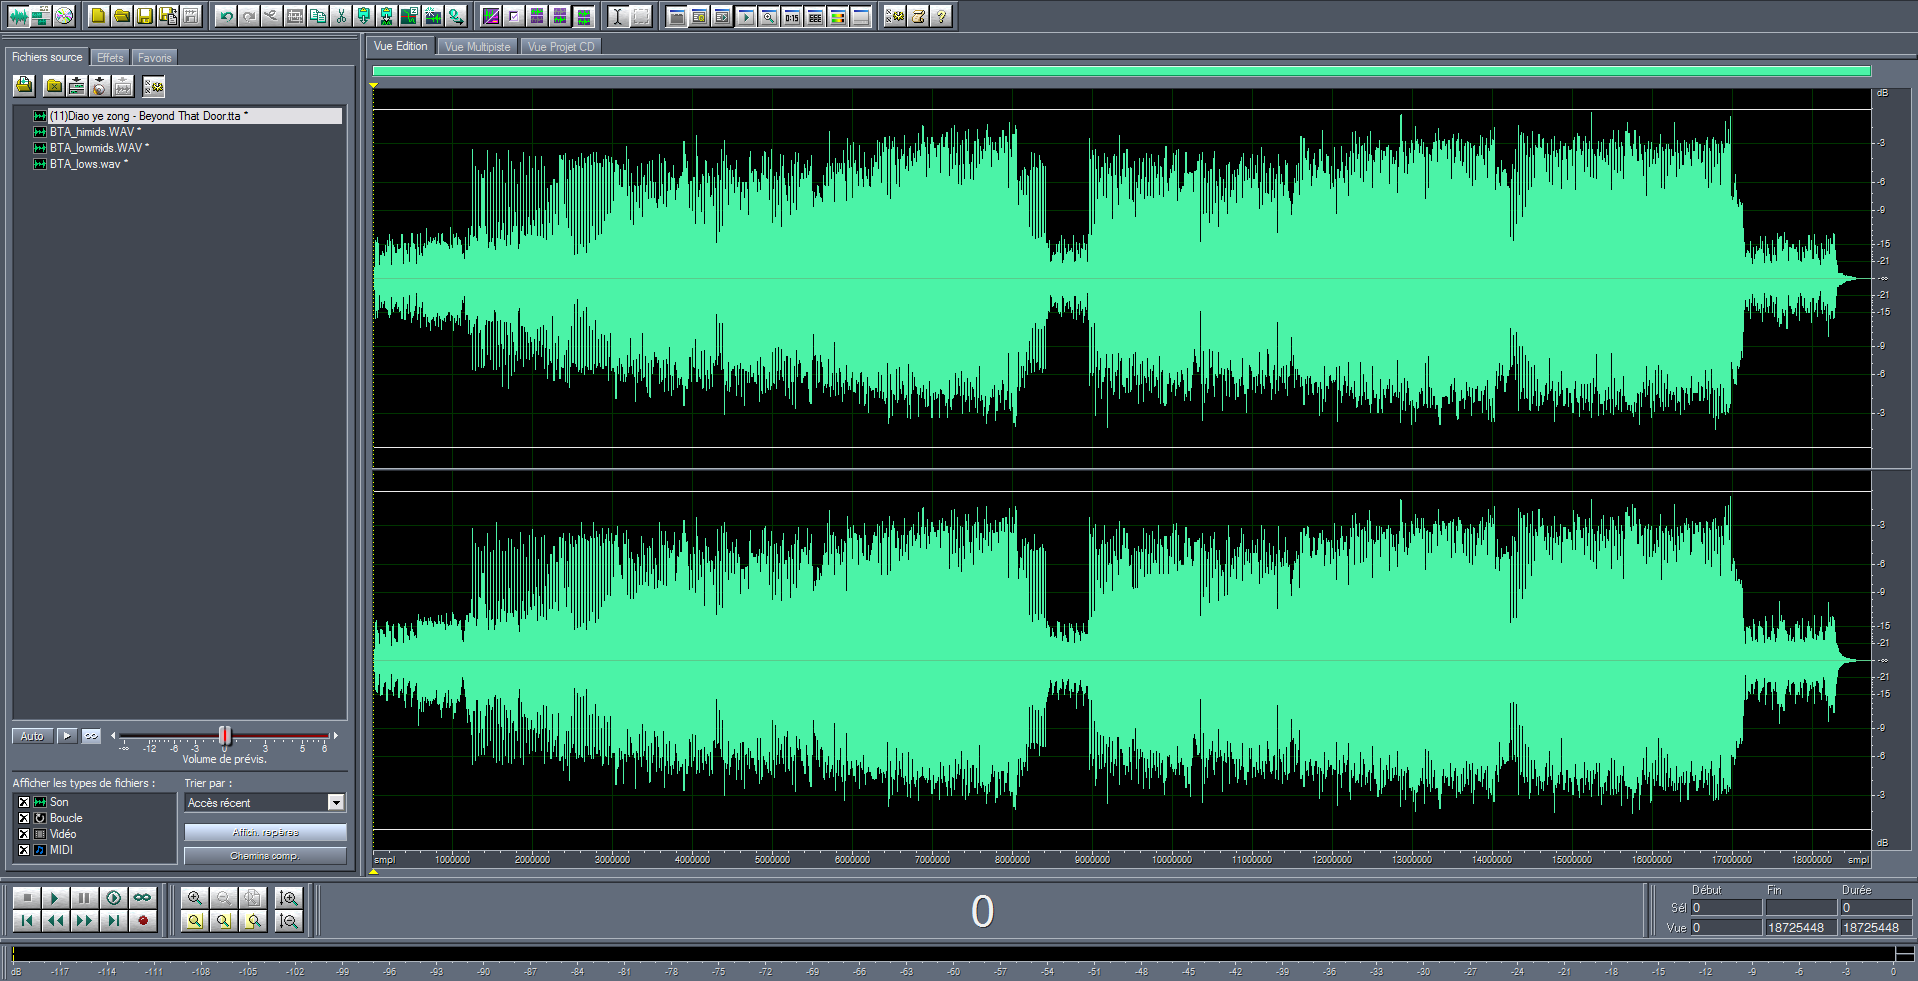
So far, this waveform now looks amazing. And the song also sounds more open, more dynamic. As I unfortunately don’t own high-end or good monitor speakers yet, I can’t hear any obvious artefact using this method. I’m pretty sure it’s actually producing very minimal artefacts if none. However, if you happen to have high-end equipment and are able to pick some artefact of any sort, please let me know.
You can listen to 30s samples of:
- A loud portion of the song untouched and reduced by 6dB
- And the same loud portion with attempted increased dynamic range (crest factor)
I posted 30s samples on Hydrogenaudio forums if you want to compare (please forgive my relative newbness there, I never liked forums — I know I should have avoided that, but it seems I’m too lazy to read rules thoroughly):
https://hydrogenaud.io/index.php/topic,113240.msg932367.html#msg932367
Respectively, you have a 30s sample (with selected parts cross-faded) of the song used in this example, after my transient and loud part restoration attempt, as done in this how-to. Then, the same song untouched with 6dB reduction. The 3rd example is an earlier attempt I did, a long time prior to writing this, using similar settings and method with slight differences. I personally prefer this sample, as I was a bit more tasteful in restoring bass transients.
Feel free to comment if you have questions and remarks about my method, or if some parts look obscure or hard to understand to you, or if there are any mistakes or oversight. I hope I have been useful in helping you fighting the loudness war.